Are you daydreaming about a perfect day of surfing and endless rides? Here’s a simple step-by-step tutorial on how to draw an ocean wave.
Learn how to sketch, draw, and paint a good-looking wave from start to finish. You don’t need to be an art student or a professional artist to
Get ready to produce an impressive hand-drawn picture of a wave being ridden by a lone surfer in a far, distant tropical surf break.
The following drawing lesson for beginners of all ages will turn you into a surf artist in less than five minutes.
All you need is a pencil or a pen, and a white sheet of paper or a notebook.


Bob Penuelas and the Wilbur Kookmeyer Legacy
In 1985, Bob Penuelas created a cartoon character called Wilbur Kookmeyer as a supporting character in the comic strip “Maynard and the Rat,” published in Surfer Magazine from 1980 to 1987.
Penuelas was born and raised in San Diego, California. His father taught him how to draw when he was only four years old.
The artist has always been attracted to surfing and art, and so he spent a lot of time doodling dreamy surfing waves during high school classes.
Penuelas’ impressions of Southern California and its unique surf culture are the result of countless hours spent surfing and hanging out at the beach.
Wilbur, the kooky little surfer, clicked with the readers and soon spun off to star in his comic strip.
It’s a satirization of the pseudo-surfers that started showing up at the beach in the mid-1980s wanting to look cool and mimic the surfing lifestyle without even knowing how to surf.
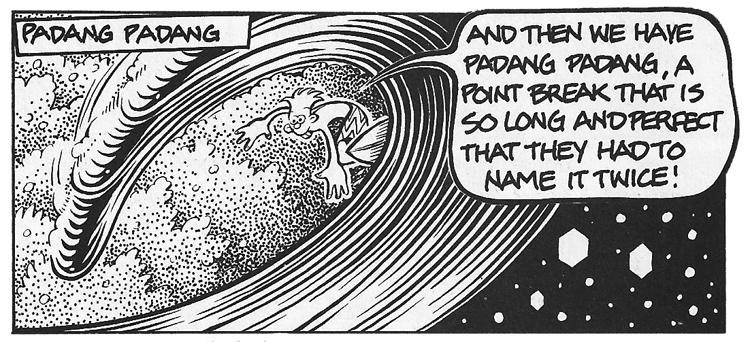
As an illustrator, Bob Penuelas drew thousands of waves, from super hollow cylinders and heavy closeouts to mushy rollers, and perfect corduroy lines stretched the horizon.
They’re arguably the most recognizable hand-drawn waves ever, alongside Katsushika Hokusai’s “The Great Wave off Kanagawa.”

Drawing Waves 101
Take Bob Penuelas’ advice and start sketching perfect waves breaking and peeling perfectly down the line.
Follow the instructions closely and restart or erase if you think you can improve your first take.
The basic steps of drawing waves will then allow you to create ocean rollers from different angles using the fundamentals of perspective.
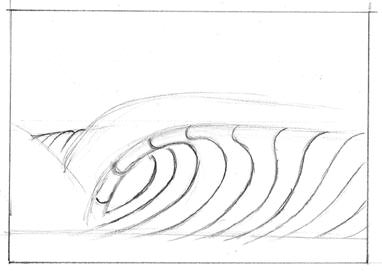
1. The Crest
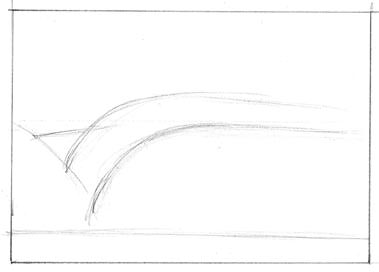
Sketch a simple shape of the crest, curl, foam, spray, and the flats, i.e., the trough or base of the wave.
The trick is to start drawing a horizontal line – the top of the wave – and then smoothly slope it down.

2. The Barrel
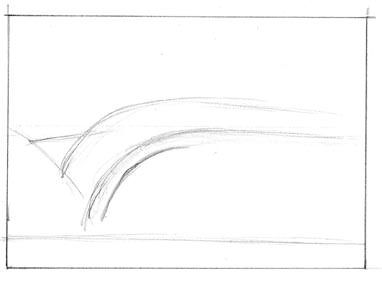
Draw a C-shaped curved line parallel to the high curl line to create a falling lip.
Then, create a flow line that starts on the higher part of the sloped line and curves around down to the trough to create the wave’s face and the tube.
Add more flow lines making sure they become less steep as they move away from the pocket toward the shoulder of the wave.



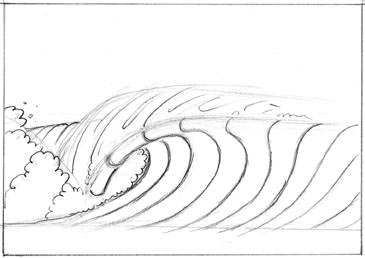
3. The Spray and Whitewater
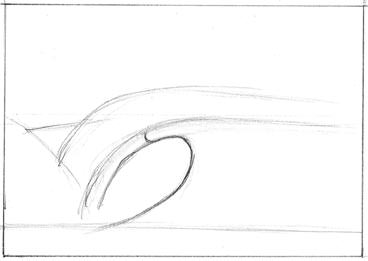
Time to draw the lip exploding on the surface of the water.
Add a cloud-like bubble that gets bigger as it moves away from the breaking wave and a small foam ball inside the barrel.
Draw a few thin lines coming out of the tube to illustrate the spray spitting from the curling wave.

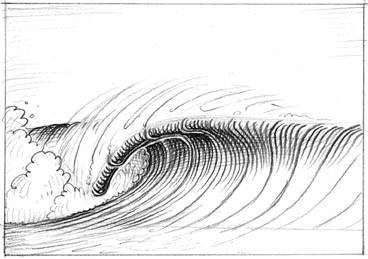
4. The 3D Effect
Adding shading on the wave will make it look tridimensional.
So, draw small and gradually darker contour lines as they get closer into the tube and below the falling lip.
When fine parallel lines are drawn closely together – a technique called crosshatching – they create the illusion of texture, shade, and depth in the wave.
Use a sharp eraser to “draw” a thin white line under the lip to separate it from the face of the wave.

Perspectives, Wave Types and Surfers
Now that you’ve successfully drawn your first wave, it’s to time take a look at how you can add surfers, create different types of waves, and even diversify the drawing perspective.
Surfers tend to look at waves from several angles.
The most common perspectives are the paddler’s view, the in and out of the tube view, the pier view, and the aerial view.
The trick is to focus on the horizon line and change the imaginary vanishing points to sketch a variety of different waves.
Try lowering or raising the horizon line and moving your vanishing points right or left.
In the end, add a surfer into the mix, color the ocean with a few shades of blue and light up those skies with stunning sunset tones.



Recent Comments